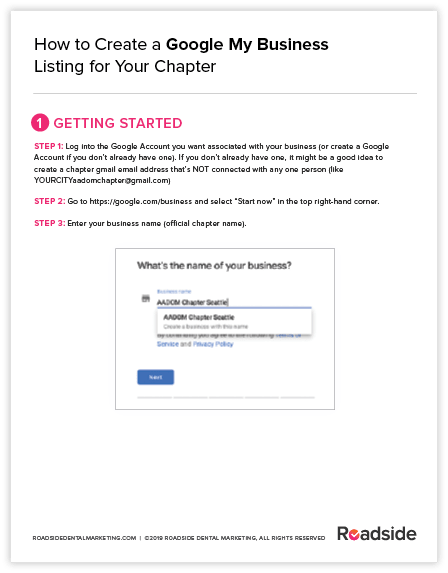
How to Create a Google My Business Listing for Your Chapter
-
STEP 1: Log into the Google Account you want associated with your business (or create a Google Account if you don’t already have one).
If you don’t already have one, it might be a good idea to create a chapter gmail email address that’s NOT connected with any one person (like YOURCITYaadomchapter@gmail.com)
-
STEP 2: Go to https://google.com/businessOpens in a new window to Google My Business and select “Start now” in the top right-hand corner.
-
STEP 3: Enter your business name (official chapter name).
-
STEP 4: Choose whether you want people to be able to physically visit your location.
-
STEP 5: Enter your business address.
-
STEP 6: Choose whether you serve customers outside of your location.
-
STEP 7: Choose your business category. Try to choose the most accurate category possible — you’re essentially telling Google which type of customers should see your business listing. We’d recommend choosing a category like “training” or “consultant.” (This can be changed later on if needed!)
-
STEP 8: Add your business phone number or website. We recommend you have a dedicated phone number for the chapter that’s not connected to an individual practice, such as a Google Voice phone number.
-
STEP 9: Choose a verification option. If you’re not ready to verify your business yet, click “Try a different method” → “Later.”
-
There are several ways to verify your GMB listing by postcard, phone, email, instant verification, or bulk verification (not applicable).
-
Postcard Verification
- Step 1: If you aren’t already logged into Google My Business, sign in now and choose the business you want to verify. (If you’re already logged in, you’ll be at the verification step.)
- Step 2: Make sure your business address is correct. Optional: Add a contact name — that’s who the postcard will be addressed to.
- Step 3: Click “Mail.” The postcard should reach you in five days — make sure you don’t edit your business name, address, or category (or request a new code) before it comes, because this could delay the process.
- Step 4: Once you’ve gotten the postcard, log into Google My Business. If you have more than one business location, select the location you want to verify. If you only have one, select “Verify now.”
- Step 5: In the Code field, enter the five-digit verification code on your postcard. Click “Submit.”
If your postcard never shows up, or you lose it, you can request a new code by signing into Google My Business and clicking the “Request another code” blue banner at the top of the screen.
-
Phone Verification
Google lets some businesses verify their location by phone. If you’re eligible, you’ll see the “Verify by phone” option when you start the verification process.
- Step 1: If you aren’t already logged into Google My Business, sign in now and choose the business you want to verify. (If you’re already logged in, you’ll be at the verification step.)
- Step 2: Make sure your phone number is correct, then choose “Verify by phone.”
- Step 3: Enter the verification code from the text you receive.
-
Email Verification
Google lets some businesses verify their location by email. If you’re eligible, you’ll see the “Verify by email” option when you start the verification process.
- Step 1: If you aren’t already logged into Google My Business, sign in now and choose the business you want to verify. (If you’re already logged in, you’ll be at the verification step.)
- Step 2: Make sure your email address is correct, then choose “Verify by email.”
- Step 3: Go to your inbox, open the email from Google My Business, and click the verification button in the email.
-
Instant Verification
If you’ve already verified your business with Google Search Console (a free tool that lets you manage your website’s search performance and health), you might be able to instantly verify your email.
- Step 1: Sign into Google My Business with the same account you used to verify your business with Google Search Console. (Some business categories aren’t eligible for instant verification, so if you don’t get a notification asking you to verify the listing, you’ll have to use a different verification method.)
-
According to Google, businesses with photos see 35% more clicks to their websiteOpens in a new window and 42% higher requests for driving directions in Google Maps.
Photos should be at least 720 pixels wide by 720 pixels high and JPG or PNG files.
Not sure how many pictures to add — or what they should be of?
-
Cover photo
Your Google My Business cover photo is one of the most important, as it shows up front and center on your listing. Choose a photo that shows off your chapter’s fun personality!
-
Profile photos
Your profile photo is what appears when you upload new photos, videos, or review responses.
Along with your profile and cover photos, you can and should upload other pictures to make your listing more informative and engaging. What types of photos should you include?
- Photos from chapter meetings
- Photos of your chapter members at the AADOM Conference
- Photos of members at their practices
- Photos from community events your chapter has participated in
-
A simple (and FREE!) way to help grow your chapter’s online presence is to get a steady stream of Google reviews for the chapter.
-
Ask your members to leave a Google review on the chapter’s GMB profile describing how your AADOM chapter has benefited them personally and professionally.
-
They can also then ask their doctors to leave reviews describing how the chapter has impacted their practice.
-
Finally, if you have non-member guests at your meetings, invite them to share their experience on Google as well!
-
Are you interested in help with marketing your chapter or our new template chapter website? Book a time to chat with Angela!Opens in a new window to Angela’s calendar